Oracle VirtualBox provides different networking solutions for the guest VMs, such as Bridged (VBox how to enable bridged network) or Bridged. In this guide, we will try out the virtual NAT configuration.
The Virtual NATing concept
Oracle VirtualBox by default sets the VM network to NAT (Network Address Translation). Let me explain it using a Network diagram to have a good understanding.

You have your VirtualBox Host running on the host Operating system, which is connected to the LAN via cable or WiFi. This is how you get an IP address and internet access.
Now that Virtual Box’s virtual router provides the IP address comes to the VM, and the VM work on a virtual Network.
How to attach a VirtualBox VM to use the NAT network?
Follow the steps below to configure or re-configure a VirtualBox VM to NAT configuration.
You would be required to stop the VM before making this change.
- Shut down the VM if it is in the running/paused state
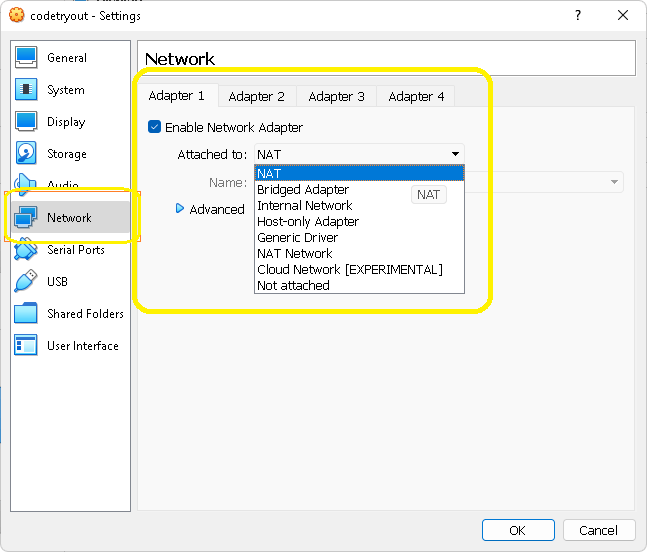
- Open the Settings menu, then select Network as shown below
- Select NAT as the option for “Attached to”
- Save the settings.
When you start the VM, it will come up on the VirtualBox NAT network.
If you want to access the VM with NAT from outside your host machine (host laptop), you can still do it using VM Port forwarding. Here is a guide explaining how to forward a webserver port, for example port 80: How to access VM port from local host machine
Conclusion
We have tried out the NAT network setup in this guide. Alternatively, if you want to make your BM IP visible to the local LAN, you can configure it in the Bridged networking method. Here is the guide: How to configure VirtualBox VM on Bridged Adapter.